
Programming is a great way to teach kids about logical thought processes and also a super fun way to engage with computers that doesn’t involve mindless zombie killings. In this post I want to take a look at Scratch – a programming tool for kids, by MIT. It’s great. You’ll love it.
Scratch takes complex programming principles and displays them as drag & drop blocks. It doesn’t get much simpler. All that’s left is to understand that computers really only ever do EXACTLY what we tell them to.
I’m going to use a project I’m designing for my Nephew. He studies Japanese at his school, so I thought why not have him build a program that translates a word into Japanese and read it back to him? So here we go:
The Workspace:
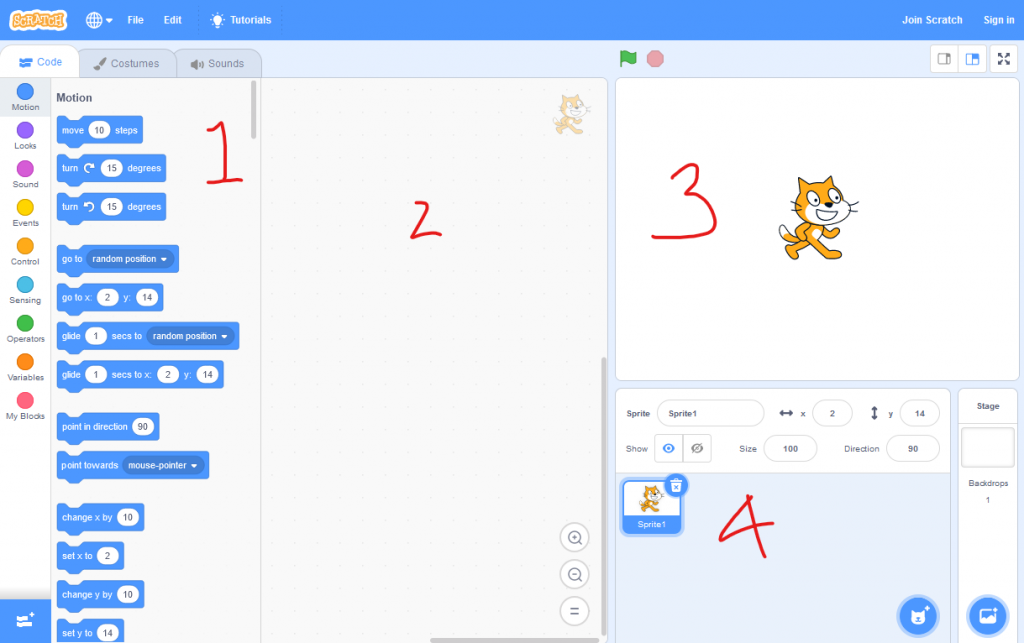
While there are heaps of cool features, we’re just going to be focusing on the core programming aspects here (maybe I’ll do a post about the other bits later).
- The Program blocks (The bits we drag and drop to make the program)
- The Workspace (The Place we drag our code blocks and snap them together)
- The Output/Preview (This will be where we preview our running program)
- The Sprite/Stage workspace (This is where we can select and layout our characters (sprites) and backdrop/stage)
It’s worth taking the time to scroll through the code blocks to see the kinds of things you can do. As you get better at using the interface, and programming in general, you’ll find more ideas pop into your head if you already have some idea of what the platform can do. Anyhoo, let’s get into Making a Translator Program Using Scratch:
Before we begin, we’re going to need to add some extensions to give us some extra programming blocks/functionality. Click the add Extension button in the bottom left of the screen.
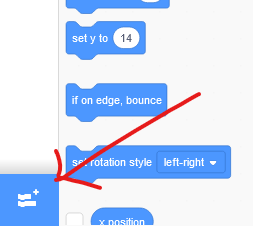
We are going to need “Text to Speech” and “Translate”.

Now that we have all the nuts and bolts, lets discuss the main parts we will need to get this program happening.
- User Input – We need a way for the user to enter in the word they want to translate
- We need to use the answer/result from that input and put it through a translator.
- We need a way to read out that answer
- We need to display the answer on screen.
That’s essentially all there is to this program, so let’s get to it.
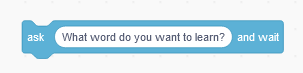
Every program needs a starting point, I chose “Click Sprite”. So when the user clicks the cat (or other sprite, if you choose something else) the program begins.
User Input : This block will let us ask the user a question and save the answer to memory. This answer is called a variable and is usually saved for later use. In our case we are saving it to use with our translator function.
Do the translation and say it out loud – this is made up of 3 parts in one. The Answer from out last block, the Translate block (to translate the answer from our question), and the Speak block (to say the answer out load).
We Place the answer inside the translate block and the translate inside the speak until you have something like below:
So now we should have this:
This will translate our user’s word for them and read it out loud.
OK we’re good for a test run! Click on the sprite and the program should:
- Ask our user for the word they want to translate
- Read the translation out loud
I have added the sb3 file here if you’d like a little cheat to get you started. You can save it then when in scratch, choose File > Load from your computer.
This guide has taken waaay longer than I anticipated, so I will follow it up with some more parts. Next we will be having the program display our translated word on screen, and maybe after that we can add some features to it just for fun.